
Functional Fitness in the Fire Department
Posted by FMS
Over the last few years, I’ve had the incredible opportunity to work as an instructor for Functional Movement Systems (FMS).
At FMS courses, we have the pleasure of working with teachers, personal trainers, physical therapists, physical education teachers, doctors and many other professionals.
In the past, the FMS Level 1 course (now called FMS Level 1 -- Movement Experience) was designed to do three things. First, give you some historical background on the FMS, second, demonstrate how to successfully run the screen and third, teach you how to interpret the results.
The FMS Level 2 course (now called FMS Level 2 -- Return to Movement) started with tips for running your best FMS and performing a full screen to enter the experience knowing your full FMS and other course attendees to apply the scoring interpretation and corrective strategies . Next, we went over the FMS corrective algorithm and spent lots of hands-on time doing corrective exercises. We wrapped up Level 2 courses with some program design considerations.
As instructors, we are very specific about how the FMS should be run. We spend a significant amount of time focusing on verbal instructions, set up position and scoring criteria.
The screen is simple to run on purpose, but just because it’s simple, doesn’t mean we don’t need to pay attention. There is a correct way to run the screen and it’s important to follow the specific guidelines in order to determine an accurate score. It’s easy to skip verbal instructions and rush through the screen. I know, from my own experience when I move too quickly, I often miss vital information.
Students often attend FMS courses to ‘fix’ and improve either their own or their client’s movement patterns. But how do we know what patterns to attack if our screen is inaccurate?
If you aren’t assessing, you’re guessing.
Over the years, our staff at FMS has seen specific portions of each screen that people often either glance over or miss completely.
Today, I will cover three common screening mistakes we often see made during live courses. I’ll also give you you some feedback on how you can run your Functional Movement Screens with more accuracy.
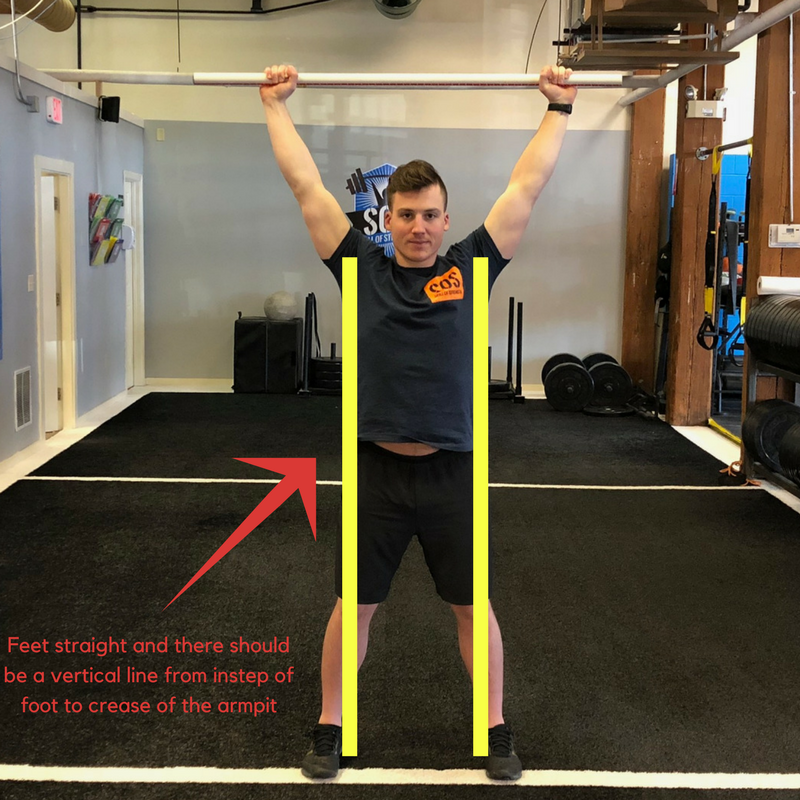
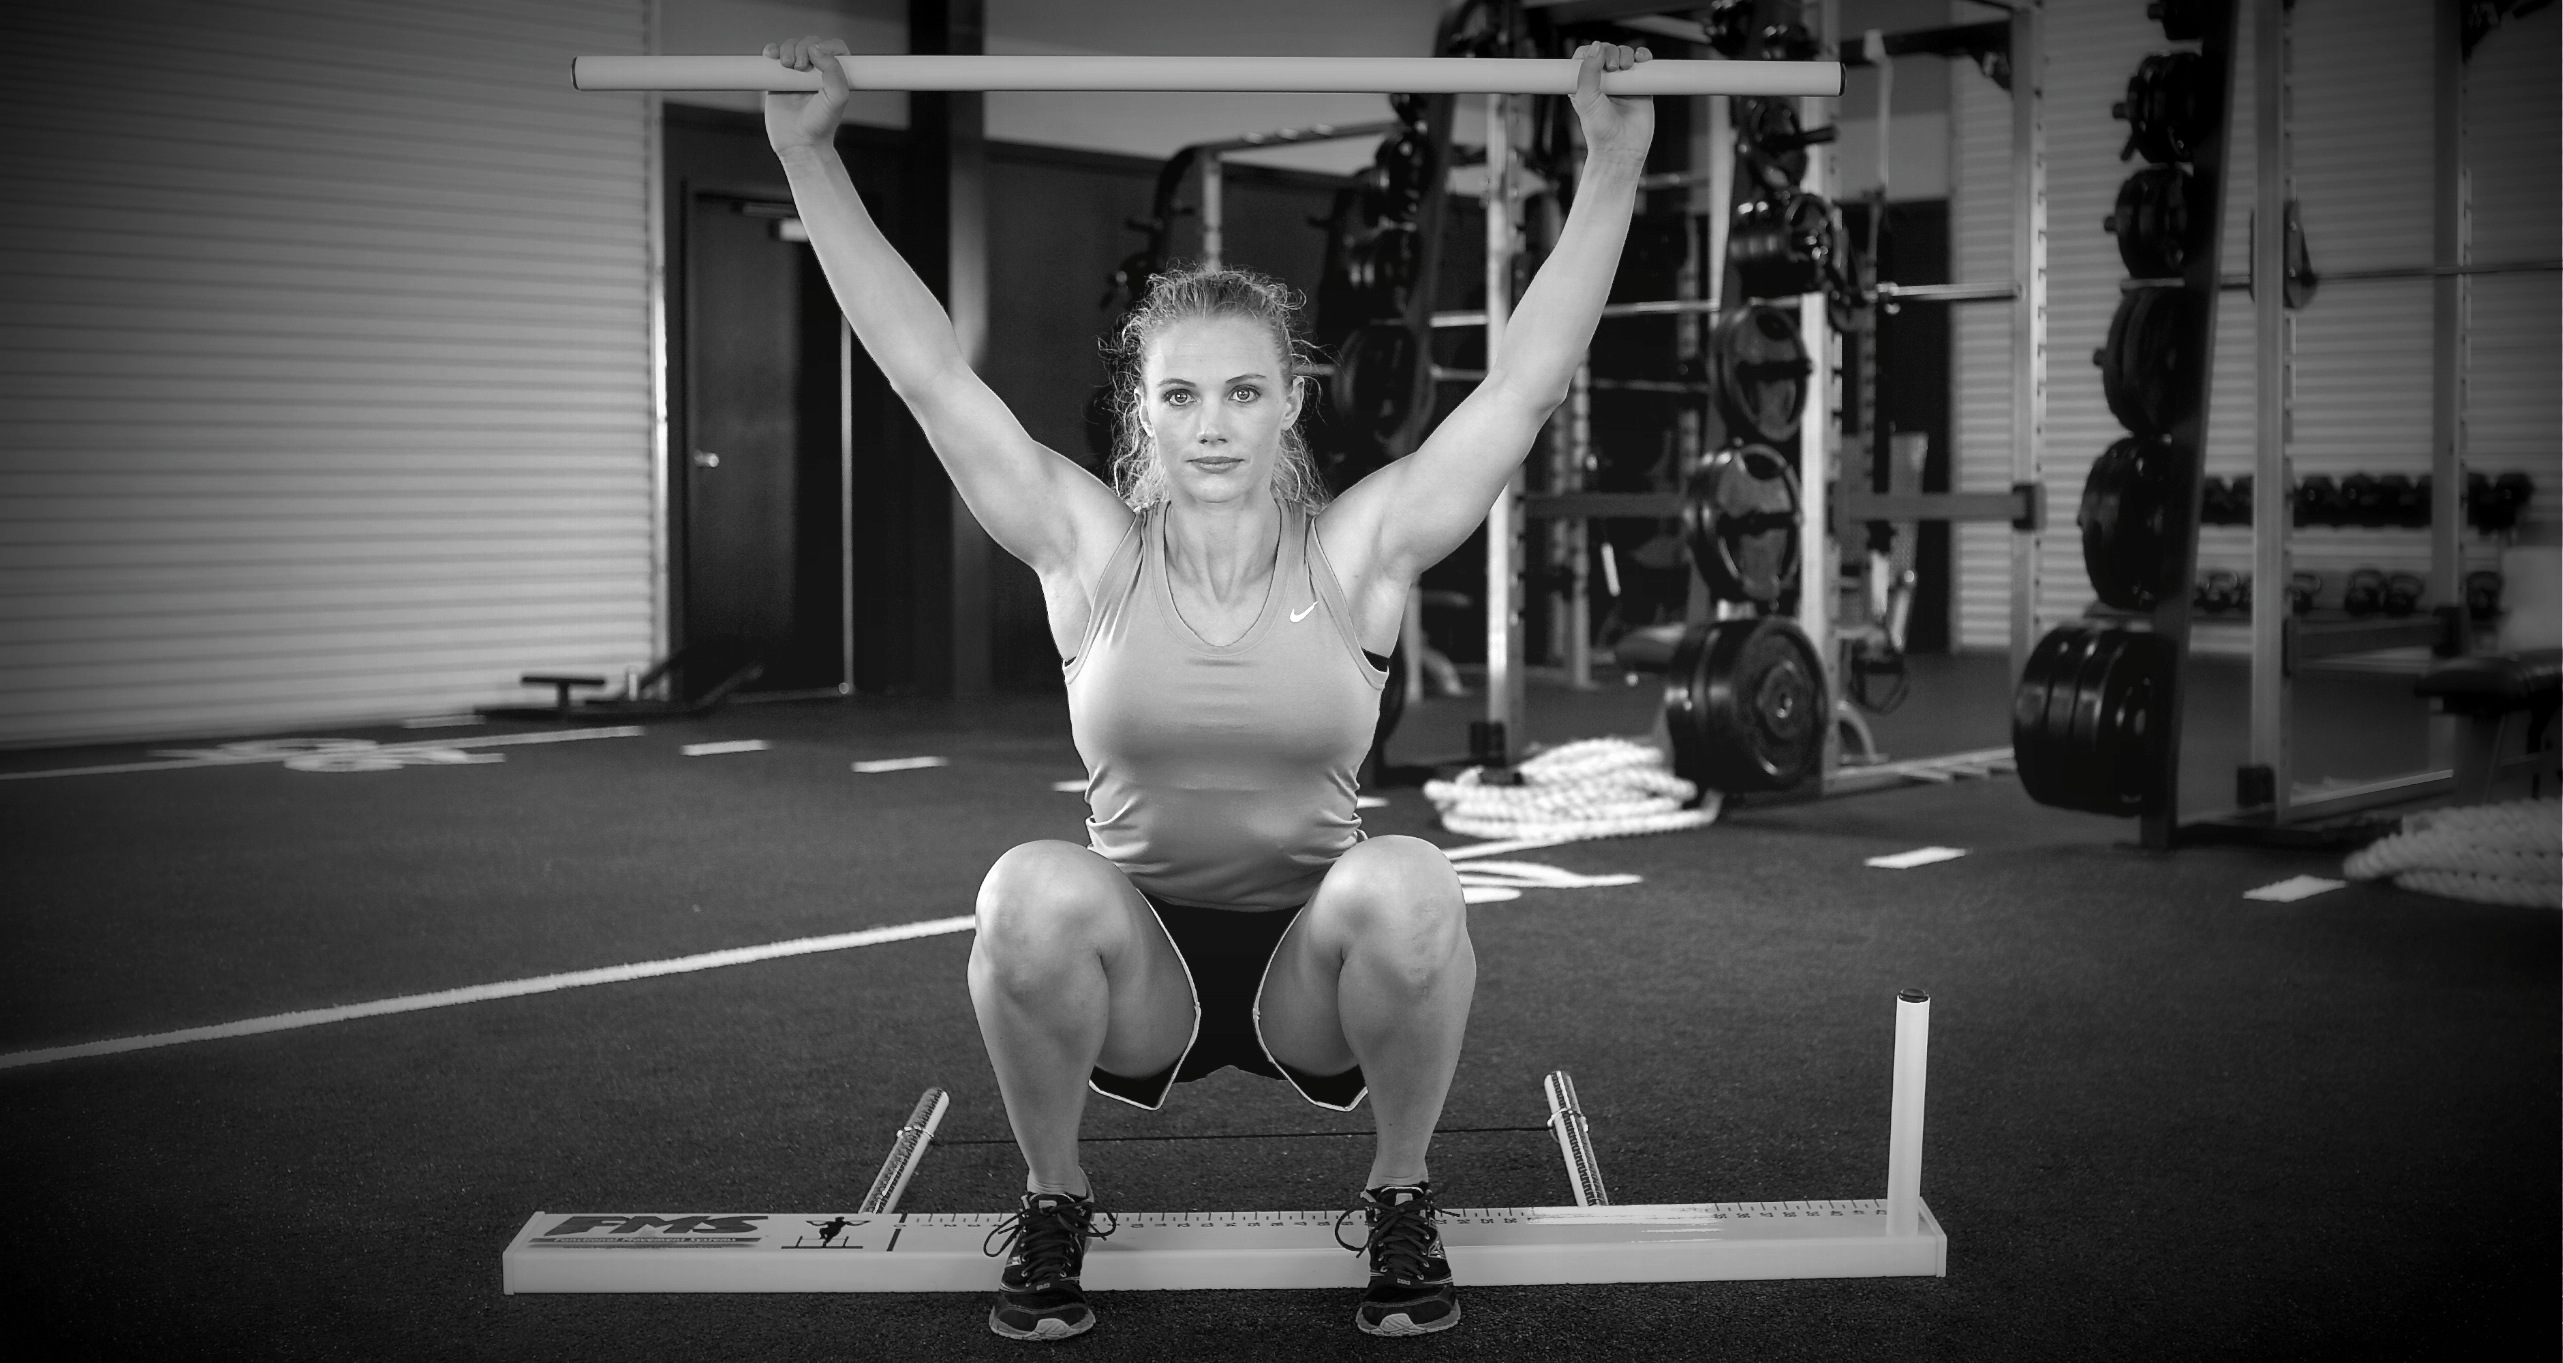
The most common mistake we see when students are learning how to test the deep squat is improperly setting up the foot position prior to each repetition. Please note, today I’m going to focus on the lower body cues and not the full set of verbal instructions for setting up for the deep squat.
An integral part of the verbal instructions is “stand tall with your feet shoulder width apart and your toes pointing forward.” The inside edge of the foot should be in vertical alignment with the crease of the armpit to establish shoulder width stance.
Let’s say the rest of the set up on the deep squat looks good (upper body and dowel position) and your client has the ability to get into the proper start position. As they perform the first repetition of 3, you’ll sometimes see external rotation in one or both of the feet. If you see this compensation, all you know is that the first repetition is not a 3. If you’re going to test for a 3 again, you need to realign the inside edge of the foot and vertical alignment with the crease of the armpit. It’s vital that we do not test for a 3 with the feet externally rotated.
To be clear, if they CAN get into the start position, but we see any external rotation of the feet during the first repetition, the second repetition and the third repetition, it is not a 3. You’ll need to change the start position to test screen for a 2. If they CANNOT access the starting position at all, it’s a score of a 1 due to the inability to get into the start position.
So, be sure to reset those feet after each repetition. This includes all reps whether you’re testing for a 3 with feet on the floor or testing for a 2 with the heels elevated on the testing kit.
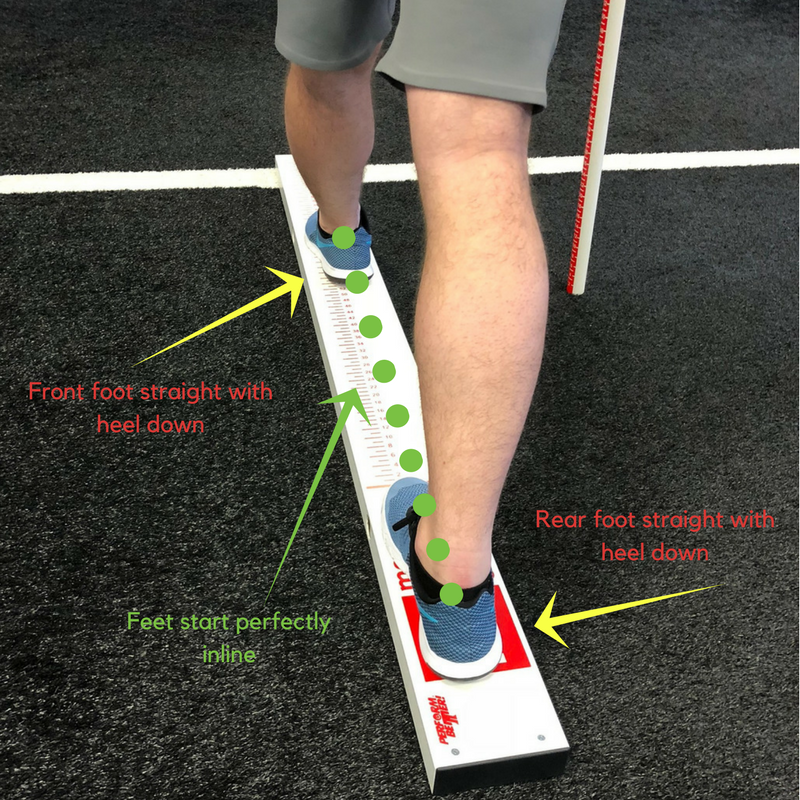
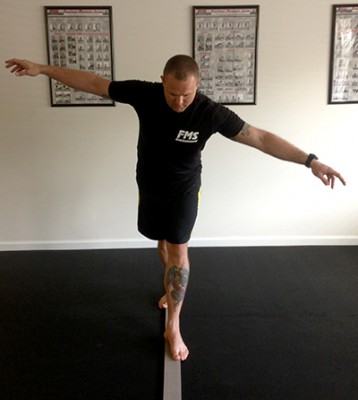
Once you’ve screened the hurdle step, you use the height of the tibial tuberosity when screening the inline lunge.
In order to run the inline lunge screen accurately, you’ll need to be sure your client gets into the proper starting position.
The client should place the toe of the back foot at the start line of the kit. The foot should be perfectly straight with heel down in the center of the board. Using their tibial measurement, the client should put the heel of his front foot at the appropriate mark on the kit. The front foot should be straight and the heel should stay down.
If the client cannot get into this inline position, they do not have the ability to get in the proper starting position and they have a score of 1. It’s easy to breeze through the lower body set up on the Inline Lunge. If you do not pay attention, a good portion of your clientele will start the inline lunge with their back foot externally rotated. If you start the screen with a compensation like this, you are once again scoring inaccurately and missing something.
Be sure that both feet are in a straight line and the heels are down on the in-line lunge. It’s important to note, you should also be sure to utilize the verbal instructions and the rest of the screen is run correctly.
Men and women have slightly different start positions for the trunk stability push up. When testing screening for a 3, men start the push up with their thumbs aligned with the forehead and women start the push up with their thumbs aligned with the chin. When we test screen for 2’s, men should align their thumbs at the chin height and women at the clavicle.
Whether you are screening a male or a female, you need to be consistent with the set up on each repetition. It’s important the cervical spine is neutral by having them look down to the ground and to make sure you have your client align the web of his/her thumb with the crease of the armpit. This is a part of the verbal instructions that is often missed.
When in doubt, always look back at the manual. If you haven’t gotten the opportunity to recently attend a live course, check out our 2018 course offerings here.
 Mike is the founder and owner of Skill of Strength, a training facility located in Chelmsford, Massachusetts. In his fourteen plus years as a Personal Trainer and Strength and Conditioning Coach, he has trained clients of all ages and abilities, including athletes represented in MLS, NFL, MLB, UFC, Bellator MMA, CES MMA, and several other MMA promotions in New England. He also trains and competes in Brazilian Jiu Jitsu under Raphael Carneiro at Fenix BJJ Lowell. Mike works for StrongFirst as a Senior Instructor and barbell instructor. As Senior Instructor, he leads teams of other instructor candidates during StrongFirst certifications and runs one-day barbell and kettlebell courses at Skill of Strength and other gyms


Posted by FMS
Posted by Gray Cook
Posted by Gray Cook

Good article. It's important to go back to the basics and make sure the screenings are being done correctly.
lovely article ....helps to be precise, and leave out the guesswork. mohan savalkar.
Great info! I just passed my FMS 1 online course and started practice screening on my friends. I was confident going into these screens and ended up walking away with many questions and the need to review videos again. This article addresses several of my questions. Thank you - very helpful!!