Take A Deep Breath
Written by Brett Jones Breathing
We have talked about breathing quite a lot here at FMS. Since the release of Secrets of the
Shoulder in 2006 breathing has taken a central role in the corrective strategies. My work with Pavel and kettlebells made breathing a focus in training and performance since 2001/2002. So, breathing and how to get people accessing the power of breathing and the diaphragm has been something I have worked with for over 15 years. Martial artists and Yoga have been developing strategies around breathing for centuries so I guess I’m a little slow on the uptake…
 Over the last 8-10 years of teaching the FMS Level 2 workshops we have used breathing as a “corrective exercise essential.” At the workshops, I demonstrate and coach everyone on how to implement a drill called crocodile breathing (based off the Yoga pose makarasana). All the attendees then go and coach their partner through crocodile breathing and once their partner has 20 or so good crocodile breaths complete (details on what that means to follow) they retest their “weak link” from their FMS screen. On average I see 70-80% of the people experience an improvement in their weak link movement pattern. This could be an ASLR, SM most commonly, but it could be TSPU or any pattern.
Why and How? Are the questions I get at that point in the workshop. Quite frankly some folks get a little “weirded out” by the fact that we see improvement in a variety of movement patterns just by 20 or so good diaphragmatic breaths. So, why and how?
With crocodile breathing and better diaphragmatic action it can relate to better “mechanics”/t- spine movement, better “motor control” or patterning, better parasympathetic/sympathetic balance, and even a better O2/CO2 balance. So, the honest answer is that there is too much going on in the multi-dimensional world of breath to provide a clear answer as to why or how but what I can tell you is that breathing impacts movement and vice versa. Therefore, it is a critical area to be able to address with your clients.
Crocodile Breathing is simply an entry point to better diaphragmatic action and just because it changes or does not change movement does not mean that you do or do not have a breathing dysfunction. With the development of the FMS Breathing Screen, we can look at the biomechanical, biochemical and psychophysiological aspects of breath and set a baseline for breathing to better answer that question.
Why begin with Crocodile Breathing?
The goal of crocodile breathing is to get back to good nasal diaphragmatic driven breathing. For myriad reasons we can begin to shift breathing to the upper chest and accessory musculature and have reduced action at the diaphragm. The floor provides a proprioceptive rich environment where with good alignment a nasal diaphragmatic breath will create immediate feedback of the stomach “hitting” the floor and the lower back rising and falling. I joke with my clients that “if you can feel it, we can fix it” so we look for proprioceptive rich situations where the “mistake” raises to level of the individual’s awareness. Then it can be addressed efficiently.
The Details
As I tell my clients: “the devil is in the details but so is the benefit.” And so it is with crocodile breathing. There are details that make this deceptively simple drill very impactful. There are also details a trainer or clinician must be looking for to avoid getting “fooled” by a client.
<== Video for qNGlSmY8 ==>
1) Positioning
2) Tactile Cueing and External cueing
3) Lateral expansion and 360° breath
4) Forcing the breath vs. allowing the breath
5) Hooklying – hand high/low, hands on sides
Positioning
You begin lying on your stomach in the prone position and the forehead resting on the hands.
Simple enough but there are some things to look out for:
1) You want to be “flat as road kill.” Do not hold yourself up posting on the elbows. Allow your body to be flat and relaxed.
2) You want to be on the front of your ribs/chest not on the edge of the ribs. This allows the rib cage and pelvis to line up better.
3) A bolster under the lower legs can create a more comfortable position and potentially help with an anteriorly tilted pelvis or lower body discomfort.
4) If the position isn’t comfortable or achievable then go right to hooklying. Not every position is for every person so if a flat, well-aligned position isn’t achievable then don’t use it.
Tactile Cueing
There is a degree of tactile cueing involved in Crocodile Breathing. This assists in bringing the improper and proper actions of breathing to the level of awareness of the individual.
1) Hands on Cueing – Hands on tactile cueing is only used after getting permission from the
individual. Do not just start putting your hands on people!
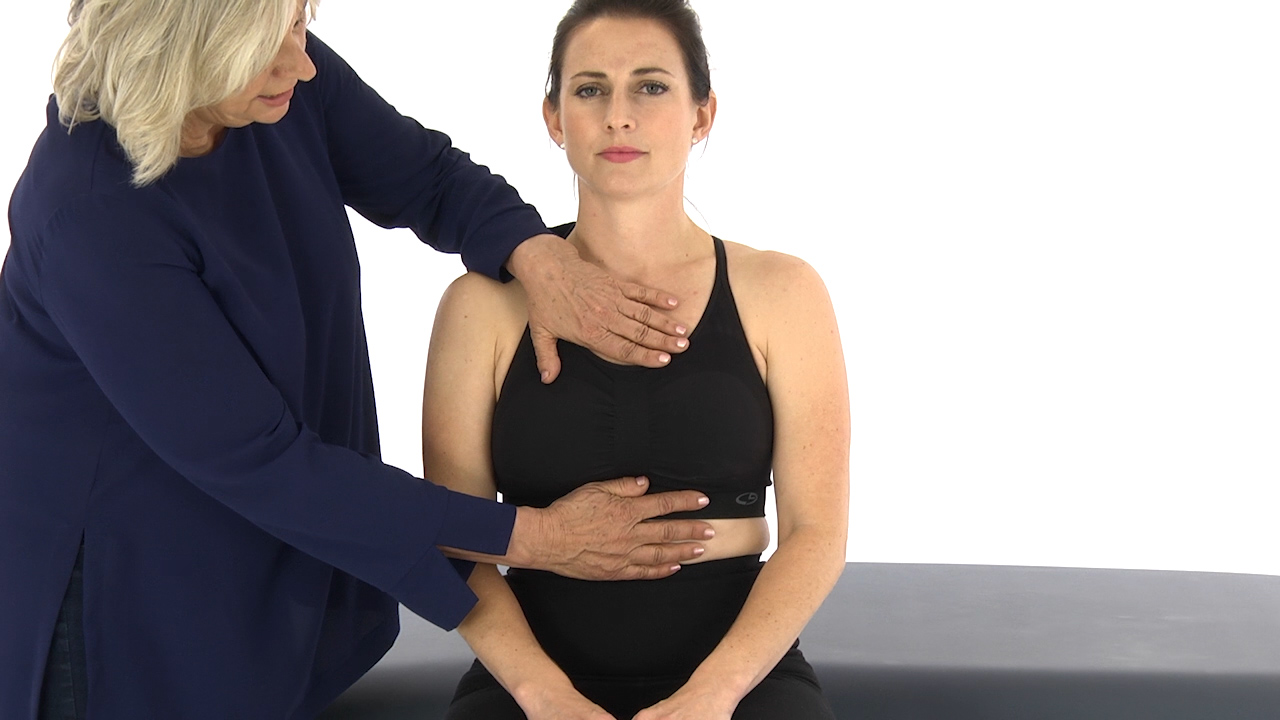
2) Hands on Cueing begins by placing a hand on the upper back and a hand on the lower back to see if the initiation of the breath “hits” the upper back or lower back first. The goal is to initiate the breath with the diaphragm causing the viscera to descend and cause the lower back to rise first. (a full breath will finish “high” so there will be action in the upper chest but not to initiate the breath)
3) Once the individual can consistently produce an 80% or more inhale with good
diaphragmatic action, the hands are placed on the sides (at the space between the bottom of the last floating rib and above the top of the pelvis) and gentle pressure is used to feel for equal lateral expansion to both sides. The person providing the tactile cueing should feel if the right and left sides expand symmetrically and evenly. If one side is slow or inactive a bit of additional cueing is used with the verbal cue to “find the fingers with your breath” and move the air to
that side more.
4) Hands off Cueing – Cuff weights (2-5#) can be used on the upper and lower back instead of the hands. And a light elastic band can be tied around the waist (at the same spot between the floating ribs and top of pelvis) to check for lateral expansion. It should not be a non-elastic strap but rather a light elastic band to provide feedback not restriction. So the band is “snug enough” to highlight the lateral expansion not so tight that it restricts it. Remember it is a tactile cue to bring the action to the level of the individual’s awareness so they can address it.
360° Breath
The goal of diaphragmatic breath is not just “belly breathing.” And yes the crocodile breath can be a bit of an “over correction” but the drill has to bring the improper and proper actions to the awareness of the individual so sometimes a bit of “over correction” is necessary.
A 360° breath where the cylinder of the abdomen is filled in a complete fashion is the
goal. Too often people will treat diaphragmatic breathing like a child being asked to “show me your belly” instead of a more subtle “belly action” due to a 360° breath.
Forcing the breath vs. Allowing the breath
Once someone “knows what you are looking for” they can fall into the trap of forcing the
breath instead of allowing the breath. Clients familiar with the goal of crocodile breathing and other breathing drills will muscle the drill forcing the breath. As with so many aspects of movement (and life), if you have to forcefully engage a movement with volitional thought and too much muscle then it will not be with you when you are “moving at the speed of life.”
Therefore, the goal of Crocodile Breathing is to relax and allow the breath to happen.
As the Coach, Trainer or Clinician you have to watch for this muscling of the drill and get people to relax and allow the breath. This also happens in drills like t-spine rotation where too much
force and muscle it brought to the movement.
Hooklying
Once good Crocodile Breathing is achieved (or if Crocodile Breathing is not possible) have the individual flip over to the hooklying position. Lie supine with the knees bent to about 90° and the feet on the floor and possibly a bolster under the head if needed to support the neck and alignment. Place one hand high on the upper chest and one hand low on the abdomen (at or below the umbilicus) and perform nasal diaphragmatic breathing where the “air” hits the lower hand first.
Once this is achieved move the hands to the sides of the abdomen (webbing of the thumbs) at the gap below the floating ribs but above the top of the pelvis so the individual can feel for equal lateral expansion and begin to build that 360° breath.
Just this change in position and “gravity” can create a new challenge to the breath and
diaphragm but in hooklying the individual has a self-directed and applied drill that allows them to work on good quality breathing and diaphragmatic action.
How many?
How many good breaths should be done? Initially, I shoot for 15-20 good nasal diaphragmatic breaths in each position. As the client progresses it may only take 5 Crocodile Breaths and 5-10 Hooklying breaths to get “dialed in” for a session. It can also be simple directions like: “don’t start your training until your right and left lateral expansion are equal.”
And eventually the individual should progress beyond needing to “correct” their breath. But 3-5 minutes of good diaphragmatic breathing can always be used to help with relaxation and recovery. Drills and skills should become independent and sustainable for the individual.
Conclusion
Breathing should be the first consideration in most situations and simple drills like Crocodile Breathing and Hooklying Breathing allow for efficient work on creating better diaphragmatic action. Remember that the Breathing Screen allows for a delineation between dysfunctional breathing and someone that simply needs better breathing for their movement.
Author
 Brett Jones, Chief SFG, is a Certified Athletic Trainer and Strength and Conditioning Specialist based in Pittsburgh, PA. Mr. Jones holds a Bachelor of Science in Sports Medicine from High Point University, a Master of Science in Rehabilitative Sciences from Clarion University of Pennsylvania, and is a Certified Strength & Conditioning Specialist (CSCS) from the National Strength and Conditioning Association (NSCA).
With over twenty years of experience, Brett has been sought out to consult with professional teams and athletes, as well as present throughout the United States and internationally.
As an athletic trainer who has transitioned into the fitness industry, Brett has taught kettlebell techniques and principles since 2003. He has taught for Functional Movement Systems (FMS) since 2006 and has created multiple DVDs and manuals with world-renowned physical therapist Gray Cook, including the widely-praised “Secrets of…” series.
Brett continues to evolve his approach to training and teaching and is passionate about improving the quality of education for the fitness industry.
He is available for consultations and distance coaching by e-mailing him at appliedstrength@gmail.com.